The film can be viewed at the bottom of this post.
Recently, I’ve taken on the role of Film Director at The Experience Community Church (still doing my own films and books, too, of course). For our February 2015 Worship Night, I was told the theme is “courage,” which made sense because the night’s slogan was “You Make Me Brave” (based on the song, obviously).
When someone comes to you and says, “The subject is ‘courage’. Now, go make four short films about it,” you quickly begin to realize just how difficult a broad topic can be. There were so many directions I could take this theme. For whatever reason, it had been a long time since I had dealt with a vast subject matter. Basically, everything I had been doing for over a year was focused and specific. My mind reeled with too many possibilities, over-thinking every aspect of every idea and getting everywhere fast. I needed to find a somewhere, a destination, a point to work from. I researched the Bible, the web, and movies with courageous characters, exploring many winding paths
My focus came when I began reading so many memes and articles about fear. Fear was always there, like my persistent cat when he wants food. It always popped up right along side of courage, no matter where I went. The more I thought about it, the more I agreed with them: Fear and courage are intertwined. You can have fear without courage, but you can never have courage without fear. It’s kind of like the chicken and the egg conundrum, except we know the answer to this one (and the chicken came first, just sayin’).
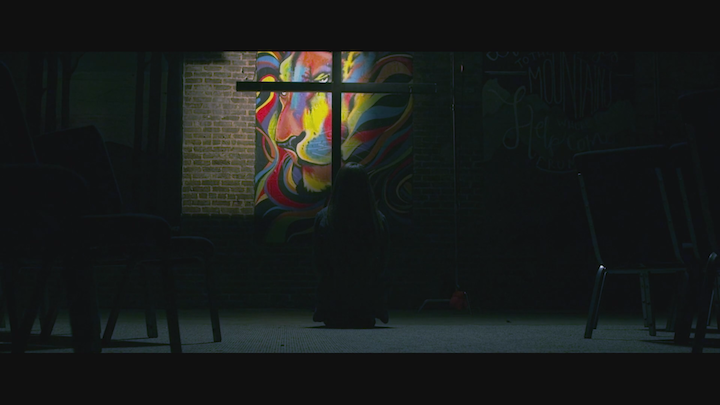
Quickly, I realized that the subject was really fear and overcoming it, rather than just conjuring up courage out of thin air. And with that, I had the first film for the worship night… After all, what better thing could there be to represent our courageous Jesus than the illustration of one of his most powerful descriptions: the Lion. And what better adjective to describe our current culture, paralyzed by the fear mongering media, than fearful?
I had about two weeks to get everything together for all four of the worship night films, and I had two previously scheduled jobs as cinematographer for a couple of shoots that totaled four days of that time. And then, we had a lot of freezing rain, ice, and snow move through that kept wrecking my scheduling, so needless to say, it was an immensely stressful couple of weeks!
To get started I wrote a voice over and script. For my film friends out there, even if there is no dialogue, it can still be very helpful to write a script. It may be just a bunch of action lines and narration, but the writing allows your mind to walk through the scene, and those words on a page are your guide to timing your film and tweaking its flow. So, you shouldn’t just think of a script as dialogue but as the first solid draft that guides your camera movement and shot list.
Once I wrote a draft of the voice over and spent a little time editing it, I emailed it to the associate pastor, Josh Brooker, so that he could make sure I didn’t say anything stupid and also to have a second opinion. You should always get other people that you trust to read your scripts! He signed off on it, and I got to work on the shoot.
The painted lion on the wall (by the incredible Paige Alcorn… who has an awesome name, I think) in the film was inside The Experience’s worship space, so I didn’t have any issues with acquiring a location, but I did have issues with how I wanted to shoot it. So, I took my Canon 7D and one light to the building and started doing some lighting tests a couple of days before the shoot. I thought I had it all planned out perfectly, but once we got there for the shoot, the lighting I had planned on using for the kneeling person (which ended up being my wife, due to more freezing rain) was entirely too much. And no matter what I tried, what I needed was for the light to hang directly overhead.
Finally, I thought, “Well, I don’t have any chains, but the light isn’t heavy, a ladder is in the far corner of the room, and I have a bunch of power cords.” I positioned her a little further back, underneath a beam, and I set to work tying up the light by wrapping extension cords around the beam. It wasn’t ideal, but it worked and was totally worth the extra effort! I’ve often found that the little bit of extra effort that you try to talk yourself out of going through for a shot will likely give exponentially more back to your image than the effort you put into it. So, go that extra mile for your images, friends!

Hanging up that pesky light.
My poor little wife had to clear out a path of chairs all by herself, while I set up lights and camera. I felt bad about that, but we didn’t have any other choice, unfortunately.
The film was shot on RED Scarlet at 3KWS 60p, with a Canon 24mm f/1.4 L II prime lens. For the smoothness of the long push in throughout the film, I used a DJI Ronin with Cinemilled roll arm and pan arm extensions to fit my Scarlet’s back battery system. Here’s a picture of that setup:

Scarlet and Ronin with Cinemilled extensions.
Flying over her shoulder was kind of a spur of the moment decision that I thought looked cool, but otherwise, the shooting was pretty straight forward. I did three or four takes, and we were done.
At home I chose my favorite take, and pulled it into After Effects to run color grading, noise reduction, and Warp Stabilizer (LOW, at around 5%) all in one rendering pass (for the sake of time). Once all of that was finished I put it back into Premiere Pro and exported a TIFF of the frame where I wanted the animation to start. Then, I pulled that frame into Photoshop to use the Clone Stamp on the wall to make matching textured teeth and a painted black wall underneath where the lion’s jaw would move down. I had to use Google images of lions for a reference of what the teeth should look like, which made me laugh… That was new.
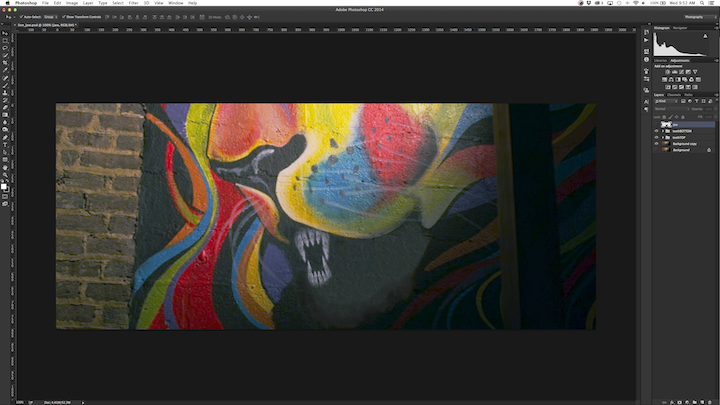
Lion in Photoshop CC
Once I had all of those elements together, it was time to animate! Really, it was a simple animation, but for a little added realism (but again, given my time constraints), I used the Puppet Warp pins to make the lion’s lip curl upward subtly as the jaw went down. I wish I had been able to spend more time on it, but I think this one little step really helped to sell the animation in a very short time frame.
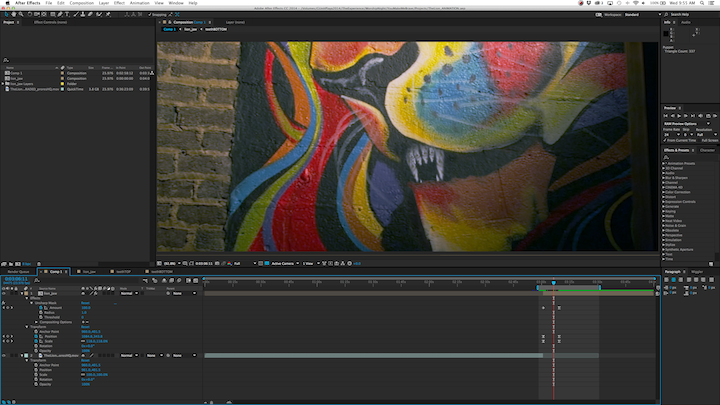
Lion in After Effects CC
I had planned on doing an animation of several scriptures in the lengthy break of the voice-over in the film, but I just plumb ran out of time. I literally had to make the choice of what would solidify the impact of the film more, a montage of scriptures, or an animation of the lion. The other films would be taking care of some other scripture references, and our worship leader, Kyle Elkins, does an incredible job of choosing songs that drip with the Word and the Spirit, so I opted for impactful imagery. After all, it is a film.
The sound design was my last step, once all of the elements were created. I recorded the voice-over myself in Logic Pro X, while listening to the music I had chosen from AudioJungle. I actually didn’t have a low growling noise of a lion, but I did have one of a puny tiger that should be ashamed of his (her?) roar. I used Flex Time to lengthen and simultaneously lower the pitch of the growl and applied a subtle Sub Bass to the sound. I mixed and mastered with all of the speed I could muster, and the film was finished!
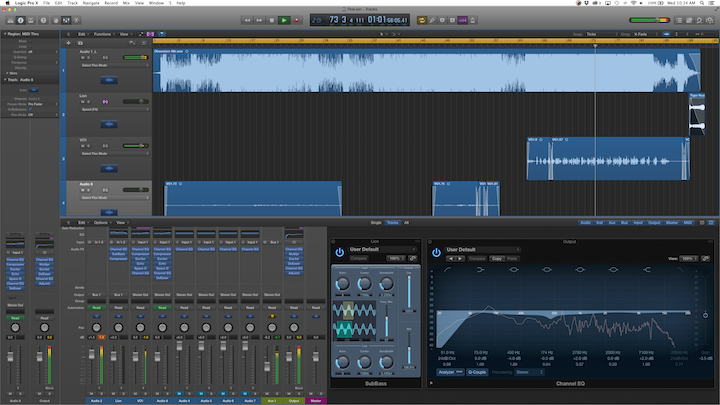
Lion in Logic Pro X
As with any film, I definitely wish I had been able to spend more time on this one, but overall, given the severe time constraints I was under, I think it turned out pretty well. It could always be better, of course, but sometimes you just gotta let it go, ya know?
So, what do you guys think of the film? Leave a comment below!