I have been using Logic Pro 9 since 2009. Given the amount of music I have released through my films, I think a lot of people assume that I use ProTools. While I like ProTools, the case used to be that you had to actually own an Avid audio interface to use the software. I had a Presonus FirePod (now updated and called the FireStudio), and I wasn’t willing to buy a new interface and new software at the same time. Plus, it was the principle of the thing, of course. Having to use a specific interface for ProTools is no longer the case, but from using both ProTools and Logic, my basic pros and cons were: ProTools renders audio better than Logic Pro 9, but it isn’t as simplified, and it costs too much to have the same amount of instrument samples and sound effects as Logic Pro 9 for $500.
Apple really tested my patience, though. They have just released Logic Pro X, but it was long overdue; so was Final Cut Pro X, and we all know what a disaster that release was (often mocked as “iMovie Pro”). Has Logic Pro X followed in the same missteps as FCP X?
After being a Logic Pro 9 guru nearly four years… After reading extensively about the new features… After downloading the software and playing with the new features and redesigned UI… I can honestly say, NO! Logic Pro X has NOT created the FCP X blunder! Apple has listened, expounded, and truly delivered a welcome companion to your music arsenal.
First off, Logic Pro X is available in the Mac App Store for just $200. That price was definitely a welcome surprise and low enough for me to buy it immediately after some feature digging. I paid $300 more for a lesser program four years ago. Yay for beating down that inflation monster!
The new UI of Logic is spectacular. Remember, I liked Logic Pro 9 partly for its simplicity (don’t confuse simple appearance with less functionality). When I’m creating music, films with After Effects, image composites with Photoshop, books with InDesign, or whatever, the LAST thing I want is for there to be so many tools, colors, and overall shenanigans on the screen that I am plagued with too much anxiety to create. Software should de-clutter your life. Like a good camera, it should just get out of your way so that you can focus on creating things. Apple has done that with Logic Pro X. They didn’t just shift things around; they re-termed many things to give way for better grouping and organization.
Despite the UI improvements, I didn’t feel like I was learning a new program. I picked it right up, found the new features, and felt at home in literally about 10 minutes; ready to rock n’ dubstep.
Have you ever used Melodyne? It’s the software that gave Autotune a run for its money. More than a simple statement of “[fill in the blank] is what key this song is in” and some attack and correction amount controls, Melodyne allows the physical maneuvering of notes that the computer perceives from an audio file, along with the ability to correct nasty slides and unwanted vibrato (Antares AutoTune can do this too). You can purchase the “Monophonic” version (one note detection and manipulation, like a vocal track) or the “Polyphonic” version (multiple note detection and manipulation, like a guitar). Why bring this up? Because Apple made their own, and it comes with our $200 Logic Pro X package.
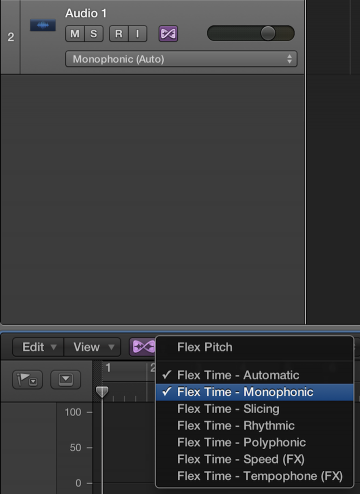
In the Flex Time feature (the ability to slow down or speed up audio to fit without warping the sound (in theory)), there is now “Flex Time – Monophonic” and “Flex Time – Polyphonic” per track. You can adjust notes by hand, smooth out vibrato, and adjust other parameters, which is much more control than a dinky pitch corrector, like Logic Pro 9 had. I have loved using Melodyne to smooth out layered vocal tracks, but with this feature included in Logic Pro X, I’m not sure that I need it anymore. Of course, doing this can color your sound, and the last thing you want is to have software drastically alter your voice print. It remains to be seen if Apple’s implementation of this technology can stack up to Melodyne’s.
You can also use Flex Time to lock transients to the grid. I used to go through a drum track and make dozens or even hundreds of splices to line the hits to the beats. Then, I had to go crossfade each and every blessed splice. Now, not only can the crossfading happen for you (if Logic Pro 9 had this feature, I never found it), but you don’t actually have to splice anything. In my experience if something is way off the beat, Flex Time will result in some wonky noises, but if we are talking about lining up a professional drummer’s work to have MIDI-like perfect tempo, this is certainly a welcome addition.
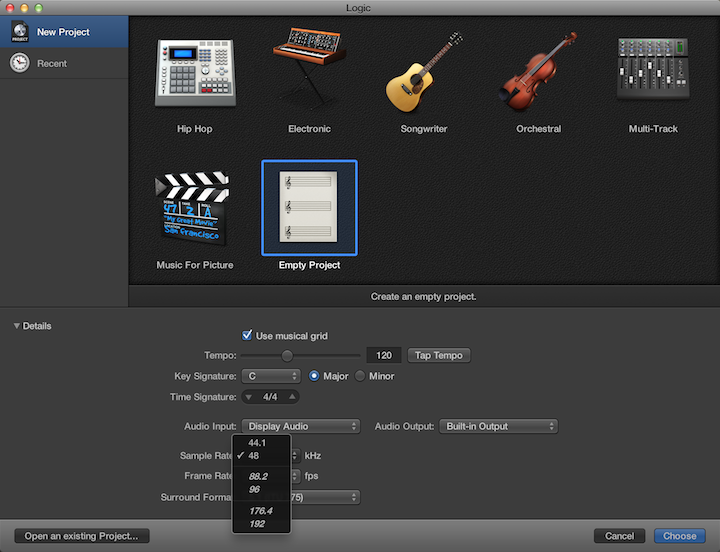
With Logic Pro 9, every time I began a new project, I had to wait for my interface to reset from 48khz to 44.1khz because Logic would default a new project to 44.1khz. Making a lot of music for film, this was a major frustration for me. Once the software booted, I then had to go to the project settings and change it to 48khz, which then resulted in more waiting for my interface to reset. A couple of minutes may not seem like much, but when you are holding something in your head or ready to begin composing, it seems like an eternity. And this frustration several times a day can really test one’s patience.
Logic Pro X has the ability to set up some project parameters before you actually create the new project; parameters such as the sample rate. BOOM! Now, I can set the project to 48khz or higher and start up that way. Problem solved. Thanks, Apple!
Among the new features are a visual interface tailored to each software instrument you are using, which you can access via a panel button or by simply doubling clicking the track, the ability to port your mixer panel to an iPad for remote mixing, and a virtual drummer… like, all it’s missing is a shirtless dude with awesome hair like my bro, Zach Ballard.
The iPad feature is super cool because you can mix from anywhere in a room, start and stop recording from your vocal booth if you’re running things solo like me, or you can simply just have another monitor dedicated as a mixing console with the tactile pleasure of adjusting automation on the fly using your finger instead of a mouse.
Speaking of mixing, a couple of speed-you-up additions to the mixing console that I noticed are a “Gain Reduction” section and an “EQ” section. Yeah, you could have compression and EQ per channel before, but this is better. Instead of going to the effects and mousing down to the EQ and then repeating that same action to add a compressor, which is something you are likely to be doing on nearly every track (adding wasted time to your life), all you have to do is double click in that space on each track. Double click the little EQ space and presto! you have an EQ plug-in patched and ready to go; same for the Gain Reduction space. When you add them, the spaces turn graphical, giving you real time feedback for the Gain Reduction and a small visual of your EQ adjustments. Mouse over those effects and you have the option to change them to something else, turn them off, or open them up for tweaking.
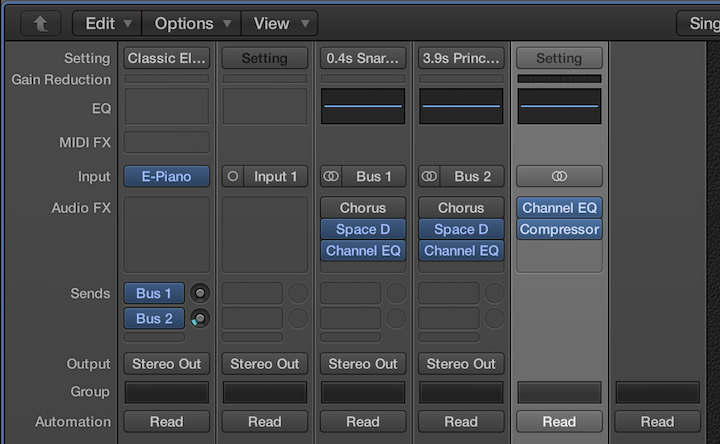
Also, under the “Output” fader is a button labeled “Bnce” which is “Bounce” abbreviated. It is a quick button to Bounce a track. This was added because “Bouncing” is now hidden on the Toolbar, which you can toggle open and closed. Bounce used to be on the menu bar at the top at all times, and I guess they just wanted to make sure you could still reach it as quickly. It’s the little things.
As another side note, holding command and clicking and dragging still allows you to change the order of effects, and holding option/alt and clicking still allows you to toggle effects on and off. However, BOTH keys are now unnecessary. Just click and drag to change the order of effects. And when you mouse over an effect, it changes from the name to a little bar that gives you the ability to turn on/off the effect, open the effect for tweaking, or open the effects drop down list to change the effect to something else entirely. Happy mousing, friends.
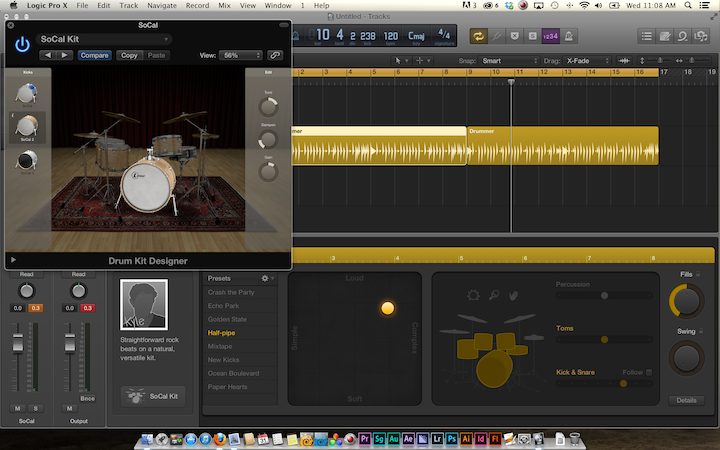
The drum designer is just plain SWEET! Click to create a new track and choose “Drummer” and you will be presented with the awesome. Choose how soft or heavy, simple or complex you want the drummer to play. Click parts of the drum set you want to activate. Tell the drummer to go with the project tempo or select a track you want it to find the tempo of and play to. Change the kit or assign portions of the kit. Apple claims over a million possible combinations with this feature alone, before ever going to manual MIDI drum creation, and I believe it!
There are a host of other new features and improvements that you can read about from Apple by clicking here. These were some of the more notable things, to me.
Something of note: I cannot find the Mastering presets. I don’t know if they’ve been removed or if I’m blind, but I can’t find them. It isn’t a huge deal for me because I often created masters from scratch, but it was nice having a starting point sometimes when I was in a hurry. Mastering presets in Logic Pro 9 were simply a saved Output channel strip setting with various plugins set various ways so, you could go through and create your own, or you might be able to port them over from Logic Pro 9. If anyone knows more about this, please let me know! I can’t imagine why they would just delete them altogether.
UPDATE: The Mastering presets are still right where they were before! I don’t know how I missed them! Maybe they came back in an update… who knows? Anyway, they are there!
I am working on a couple of new films at once right now, and when I get to audio, I will use Logic Pro X and let you all know how it does for movie mixing on a See What Happens TV blog post. At a glance, it does appear that Noise Reduction has not been a priority of Apple’s with Logic Pro X, so I’m betting Adobe Audition will be unmatched for film work, but we will have to wait and see.
Overall, I highly recommend Logic Pro X, but not because it is the latest thing. I recommend it because it is powerful and simple for $200 in the Mac App Store. Its improvements are professional and time-saving, which for me are the most important things. Note: If you download it and find it lacking, go to Logic Pro X at the top > Preferences > Advanced > and then check on some advanced features boxes. You might find some other goodies accessible. I’m guessing they did that to not overwhelm the noobs.
What about you guys? Are you going to buy it? Is there anything you don’t like about it?